
UPDATE: This post has been updated to reflect changes in the most recent Raspbian Jessie Lite image (no longer includes Node-RED or node.js) and to use the new Digital I/O for Raspberry Pi Starter Kit for I/O hardware (new code, photos, and video).
The Raspberry Pi® is an unquestionably powerful computer for just $35. And it really is just that: a computer. That means the Pi is capable of many tasks and perfect for many automation applications.
Couple the Pi to industrial, solid-state digital inputs and outputs, and you can build compelling and cost-effective solutions for commercial and industrial applications, too.
One of the easiest and fun ways to quickly build software applications is with Node-RED, the free, open-source software tool designed by IBM Emerging Technologies and used for wiring together hardware devices, APIs, and online services in new and interesting ways.
However, Node-RED is only included in the full PIXEL GUI version of the Raspbian Jessie Operating System, available from raspberrypi.org. Their latest 2017-07-05-raspbian-jessie-lite.img build for headless operation (no monitor, keyboard, or mouse required) is no longer bundled with either Node-RED or the required software tools node.js and npm.
The purpose of this post is to guide you through creating a headless Raspberry Pi computer with the latest versions of Node-RED, node.js, and npm, building a Node-RED application, and controlling and sensing GPIO connected to industrial digital I/O, quickly and simply. (For a sneak peek at the result of this build, see the video near the end of this post.)

Image: New Opto 22 Digital I/O for Raspberry Pi Starter Kit with Raspberry Pi 3 Computer
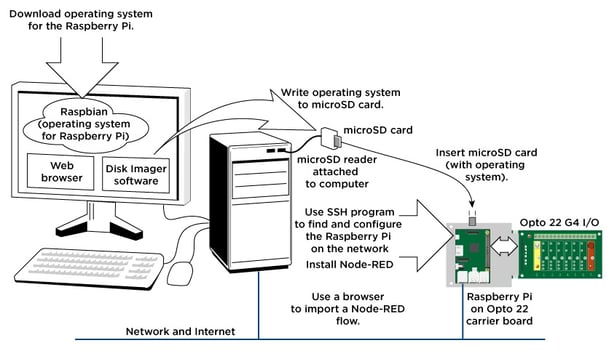
This post provides step-by-step instructions for:
- Building and configuring your microSD boot image with Raspbian Jessie Lite
- Installing Node-RED, node.js, and npm
- Configuring Node-RED to start up at boot time
- Installing various Node-RED nodes, including our SNAP PAC Node-RED nodes (optional)
- Importing a Node-RED flow for sensing and controlling digital I/O through GPIO nodes
Here is a diagram of the steps you'll take:
What you'll need:
- A Raspberry Pi - I'm using a Raspberry Pi 3
- A microSD card (minimum 8 GB) and reader for your computer
- A power supply
Optional items used in this post (needed to see the result of a Node-RED flow with GPIO nodes):
- A Digital I/O for Raspberry Pi Starter Kit - includes carrier board, rack, and various I/O modules

Now, I'm no expert with the Raspberry Pi or the Linux command line. You don't need to be, either. I think you'll find the following instructions pretty easy to do if you're careful to follow the steps in order.
When you're done, you'll have yourself a complete, powerful, and exciting computing platform to build the automation application of your dreams.
Step 1: Build and Configure Raspbian microSD boot device
Download Raspbian Jessie Lite image for headless operation (no monitor, keyboard, or mouse needed):
https://downloads.raspberrypi.org/raspbian_lite_latest
Unzip the file into your /Downloads folder.
Instructions for OS X from Terminal window:
diskutil list
- Determine microSD disk name from result (for example, for disk4):
diskutil unmount disk4s1
cd downloads/
- Choose one (1st for Jessie; 2nd for Jessie Lite):
sudo dd bs=1m if=2017-07-05-raspbian-jessie.img of=/dev/rdisk4
sudo dd bs=1m if=2017-07-05-raspbian-jessie-lite.img of=/dev/rdisk4
Instructions for Windows:
- Download Win32 Disk Imager: https://sourceforge.net/projects/win32diskimager/
- Install and start Win32 Disk Imager.
- Select image file from your Downloads folder, and choose the drive letter for your SD card.
- Click Write.
UPDATE: The latest Raspbian Jessie image from raspberrypi.org (2017-07-05-raspbian-jessie-lite.img) no longer allows SSH connections by default. You must place a file with no extension named "ssh" in the root of the card. To do this, simply create a new Text Document on your desktop with no contents, then rename the file to remove the extension. Copy this file onto your microSD card in the /BOOT/ directory. Now, you can SSH in as shown in the next step.
Step 2: Log in and Configure Headless Pi
Command prompt method for headless operation under Jessie Lite (Note: this step could be problematic if more than one Raspberry Pi3/Raspbian Jessie in its default configuration exists on your network or if your DNS cache isn't flushed. If your connection is refused, see update in previous step.):
- Mac/Linux: Attempt SSH session from your terminal application::
ssh pi@raspberrypi
- Windows: You'll need the free PuTTy terminal application download. (You can download it from http://www.putty.org/.) Once installed, enter
raspberrypiin the Host Name (or IP address) field. Make sure the port number is 22 and SSH option is selected, then click Open.
pi@raspberrypi’s password:
raspberryor for Windows:
login as: pi
Then, pi@raspberrypi’s password:raspberry
- sudo raspi-config at command prompt
- Select Option 1 - Change User Password (for example, opto22)
- Select Option 2 - Change Hostname (example: rpi-g4pb8h-benson)
- Select Option 4 - Localisation Options (example for user in California):
- Locales: en_US.UTF-8 UTF-8
- Timezone: US, Pacific Ocean
- Change Wi-Fi Country: US (press “U” to get close)
- Select Option 7 - Advanced Options; select option A1 - Expand Filesystem
- Select <Finish> and then select yes when prompted for reboot.
- Log back in with new Hostname (example: ssh pi@rpi-g4pb8h-benson).
- Enter your new password.
Step 3: Install Node.js, npm, and Node-RED
sudo su -
curl -sL https://deb.nodesource.com/setup_6.x | sudo bash -
apt-get install nodejs -y
node -v (returns v6.11.0 or higher)
npm -v (returns 3.10.10 or higher)
npm cache clean
npm install -g --unsafe-perm node-red
exit
node-red
At this point, confirm Node-RED is running by navigating with your browser to your Pi and port 1880:
http://[hostname]:1880 (example: http://rpi-g4ph8h-benson:1880)
Step 4: Build your first Node-RED app
Note: This step and the next exercise are important for two reasons: (1) They confirm everything is installed properly; and (2) They create the appropriate folders for the remaining steps.
- Click and drag an Inject node to the palette.
- Drag a Debug node to the palette.
- Wire the two nodes together.
- Click Deploy in the upper-right corner of Node-RED.
- Click the Debug tab beneath the Deploy button.
- Finally, click the tab emerging from the left of the Inject node. You should see the current time (in Epoch time) in the debug pane.
Go back to your terminal session, and issue the following command:
ctrl-c (to shut down Node-RED)
sudo shutdown -P now
This final command immediately shuts down your Pi with the Poweroff parameter, finishes disk writes, and requires you to remove and reinstall power to boot back up again. This is a safety measure to make sure all of your work up to this point is saved to the microSD card. Always wait for the green LED on the Pi to go out completely before removing power.
Note: I highly recommend always using the shutdown command to preserve your Pi file system if you intend to power down the system. If you'd rather just reboot the Pi, use:
sudo shutdown -r now
Step 5: Install SNAP PAC Node-RED Nodes (optional)
The SNAP PAC Node-RED nodes offer a simple method for querying and controlling a SNAP PAC I/O System. You can use a SNAP PAC I/O system to gather and control analog, serial, and other digital I/O modules not covered by any G4 and SNAP digital I/O connected to the GPIO of the Pi.
Note: If you’ve installed Node-RED on your existing Pi separately from the above instructions, be sure you have node.js version 4.4.5 or later installed first. This is the minimum supported version to use Opto 22’s SNAP PAC Node-RED Nodes. You can determine node’s version with the following command: node -v
pwd (should result in /home/pi)
cd .node-red
npm install node-red-contrib-pac
Step 6: Set up Node-RED to start up at boot
The Node-RED recommended method is to install Node-RED Service:
- sudo su -
- wget https://raw.githubusercontent.com/node-red/raspbian-deb-package/master/resources/nodered.service -O /lib/systemd/system/nodered.service
- wget https://raw.githubusercontent.com/node-red/raspbian-deb-package/master/resources/node-red-start -O /usr/bin/node-red-start
- wget https://raw.githubusercontent.com/node-red/raspbian-deb-package/master/resources/node-red-stop -O /usr/bin/node-red-stop
- chmod +x /usr/bin/node-red-st*
- systemctl daemon-reload
- systemctl enable nodered.service
- shutdown -r now
When the Pi reboots, Node-RED should be running. Access the Node-RED environment from your web browser here:
http://[hostname]:1880 (for example, http://rpi-g4pb8h-benson:1880)
When installing new nodes from the command line, start/stop Node-RED by using the Node-RED service commands:
node-red-stop
node-red-start
Step 7: Import a GPIO-based Node-RED flow to test I/O
This final step involves importing a Node-RED flow I've created to test the GPIO nodes and the corresponding I/O modules on the rack. (This test flow will work either with or without the rack and I/O modules.)
Power up your Pi, and log into Node-RED. Then we'll import this flow:
To import this flow, go to your Node-RED application (http://[hostname]:1880), click the hamburger icon in the top right, select "Import", then "Clipboard" and choose the New Flow button. Next, copy and paste this code into the resulting window:
[{"id":"d95eb067.d4687","type":"inject","z":"aa9ee7c0.e8cd88",
"name":"Turn On Output","topic":"0","payload":"",
"payloadType":"num","repeat":"","crontab":"","once":false,
"x":300,"y":180,"wires":[["878648ac.fc2948"]]},{"id":"878648ac.fc2948","type":"rpi-gpio out",
"z":"aa9ee7c0.e8cd88",
"name":"G4ODC5 digital output in position 3","pin":"35","set":"",
"level":"0","out":"out","x":660,"y":220,"wires":[]},{"id":"7d18b79f.0fa588","type":"inject","z":"aa9ee7c0.e8cd88",
"name":"Turn Off Output","topic":"","payload":"1",
"payloadType":"num","repeat":"","crontab":"","once":false,
"x":300,"y":260,"wires":[["878648ac.fc2948"]]},{"id":"82511eef.33cbb","type":"rpi-gpio in","z":"aa9ee7c0.e8cd88",
"name":"G4IDC5MA module in position 0","pin":"40","intype":"tri",
"debounce":"25","read":false,"x":330,"y":400,"wires":[["6f379125.5007d","878648ac.fc2948"]]},{"id":"6f379125.5007d","type":"debug","z":"aa9ee7c0.e8cd88",
"name":"Status of G4IDC5MA","active":true,"console":"false",
"complete":"payload","x":620,"y":400,"wires":[]},{"id":"2e694694.1487aa","type":"comment","z":"aa9ee7c0.e8cd88","name":"Make sure G4ODC5MA is in Auto mode","info":"",
"x":652.5,"y":146,"wires":[]}]
Finally, click Import. Now, position the nodes on the canvas where you like, and you're done. Click the Deploy button to deploy this flow to your Pi.
Now, you can click the left side of the Inject button named "Turn On Output" and you should see the value under the node named "G4ODC5 digital output in position 3" change to "0". Click the Inject button named "Turn Off Output", and the value will change to one.
If this result seems inverted to you, it's because Opto 22 solid-state I/O modules are negative-true logic: Write a 0 to turn on; write a 1 to turn off.
To see this in live action, I've used the new Digital I/O for Raspberry Pi Starter Kit (available for a limited time at $99). I placed my own Raspberry Pi3 (I purchased mine at Amazon.com) on the assembled Starter Kit atop the OPTO-P1-40P carrier board and attached that to the G4PB8H mounting rack. Then, I inserted each of the 4 modules in the orientation shown in the above photo, and below in the video. That puts my DC input module (G4IDC5MA) in position 0 on the rack, and the DC output module (G4ODC5) in position 3.
I connected the system to an Ethernet network, and powered it up using my Pi power supply (wall wart).
Note that this test flow will work without the rack and I/O modules. You just won't be able to see the LEDs positively indicate everything is working properly. In this short video I took with my phone, you can see what happens on the rack when I flip the switch on the input, and the resulting output module firing:
If you have the Starter Kit, and followed all of the instructions above, you can turn the G4ODC5 on and off from software (Node-RED). Simply click the Inject button on the left of the nodes labeled Turn On Output and Turn Off Output, as shown here:

All done!
Congratulations! You've just built a fully configured, latest-build Raspberry Pi computer with Node-RED and the ability to interface with real-world electrical loads using the Pi's GPIO pins.
Let me know how your installation went in the comments section below. I'd also love to hear any tips, comments, suggestions, or complaints, too!
Thank you for reading. -Benson
BONUS: Other nodes you may find useful
There are hundreds of Node-RED nodes available from npm and flows.nodered.org. Here are a few I’ve found useful for various tasks. There are two ways to install these nodes.
The preferred method is from within Node-RED. From the hamburger menu at the top right, select Manage Palette. Then click the Install tab in the left pane. You can search by the name of the node listed below, and click the small Install button.
If you prefer, you can also install from the command line. Use these steps:
- Establish an SSH session to your RPi.
- Navigate to your .node-red folder (usually found under /home/pi folder):
cd .node-red
Bigtimer - timer with dusk, dawn, months, days, manual override, schedule pause, and more
npm install node-red-contrib-bigtimer
Ping - for taking input and pinging devices on a network
npm install node-red-configurable-ping
MSSQL - for establishing a connection to a Microsoft SQL Server instance, locally or in the cloud.
npm install node-red-contrib-mssql
MySQL - connect and exchange data with MySQL databases
npm install node-red-node-mysql
M2X - for connecting to and interfacing with AT&T’s M2X IoT Platform
npm install node-red-m2x
Bluemix - various nodes for interfacing with IBM Bluemix IoT platform
npm install node-red-bluemix-nodes
Aggregator - for aggregating numeric values over a specific time span, including mean, median, min, max
npm install node-red-contrib-aggregator
Moment - produces a nicely formatted Date/Time string
npm install node-red-contrib-moment
SNMP - for fetching either individual oids, or a table oid from an SNMP-enabled host
npm install node-red-node-snmp
Weather Underground - for getting the current weather conditions and forecast
npm install node-red-node-weather-underground
Dropbox - to send and receive files from Dropbox cloud
npm install node-red-node-dropbox
Modbus TCP - to communicate with Modbus/TCP devices over Ethernet.
npm install node-red-contrib-modbus
Sparkplug - to communicate with Cirrus Link or Ignition MQTT servers with Sparkplug protocol
npm install node-red-contrib-sparkplug
To install all nodes at once:
cd .node-red
node-red-stop
npm install node-red-contrib-bigtimer node-red-configurable-ping node-red-contrib-mssql node-red-node-mysql node-red-m2x node-red-bluemix-nodes node-red-contrib-moment node-red-node-snmp node-red-node-weather-underground node-red-node-dropbox node-red-contrib-modbus node-red-contrib-sparkplug
node-red-start